
Timecode Creator
Turn Reaper project files or CSV marker files into timecoded sequences for grandMA consoles.
What it does
Section titled “What it does”- Turns markers into timecoded cues
Every marker in your source file becomes a cue at the exact time of the marker. - Adds button triggers through subtracks
Build triggers such as Top or Go from subtrack markers. Make the subtracks either from number-only markers or from dedicated Reaper tracks. - Sets fade times, follow-cues and cue names
Give each cue a fade time and add optional follow-cues for a “store /cueonly” workflow. Add cue length and timecode to the cue name, and split a marker name into a name and an info field.
How to use it
Section titled “How to use it”- Place your markers:
- Open your audio file in your editing program. Reaper works best.
- Place a marker at every point you want a cue.
For subtracks, use either number-only markers such as “1”, “2”, “3”, or Reaper tracks with “#ST” in the name. - If you do not use Reaper, export the markers as CSV in 30 FPS format. grandMA2 works at 30 fps internally, so 30 FPS avoids rounding errors.
- Import the markers:
- Set the import options first, so the marker list arrives the way you need it.
Set the delimiter and the column names on the Settings page. To check the format of your file, open it in a text editor and read the first line. - Import File opens a Reaper project (.rpp) or a CSV file. Import Clipboard pastes from Excel and similar programs.
- Set the import options first, so the marker list arrives the way you need it.
- Set the export options:
- Choose where the sequences, executors, subtracks and cues go.
- Set the advanced options, such as follow-cues and info extraction.
- Export the timecode and sequence:
- Manual import: save the macro and timecode to a grandMA2 or grandMA3 folder, then run the macro on the console. The macro creates the sequence and the timecode.
- Direct import: send the sequence and timecode straight to the console.
The screen explained
Section titled “The screen explained”Import
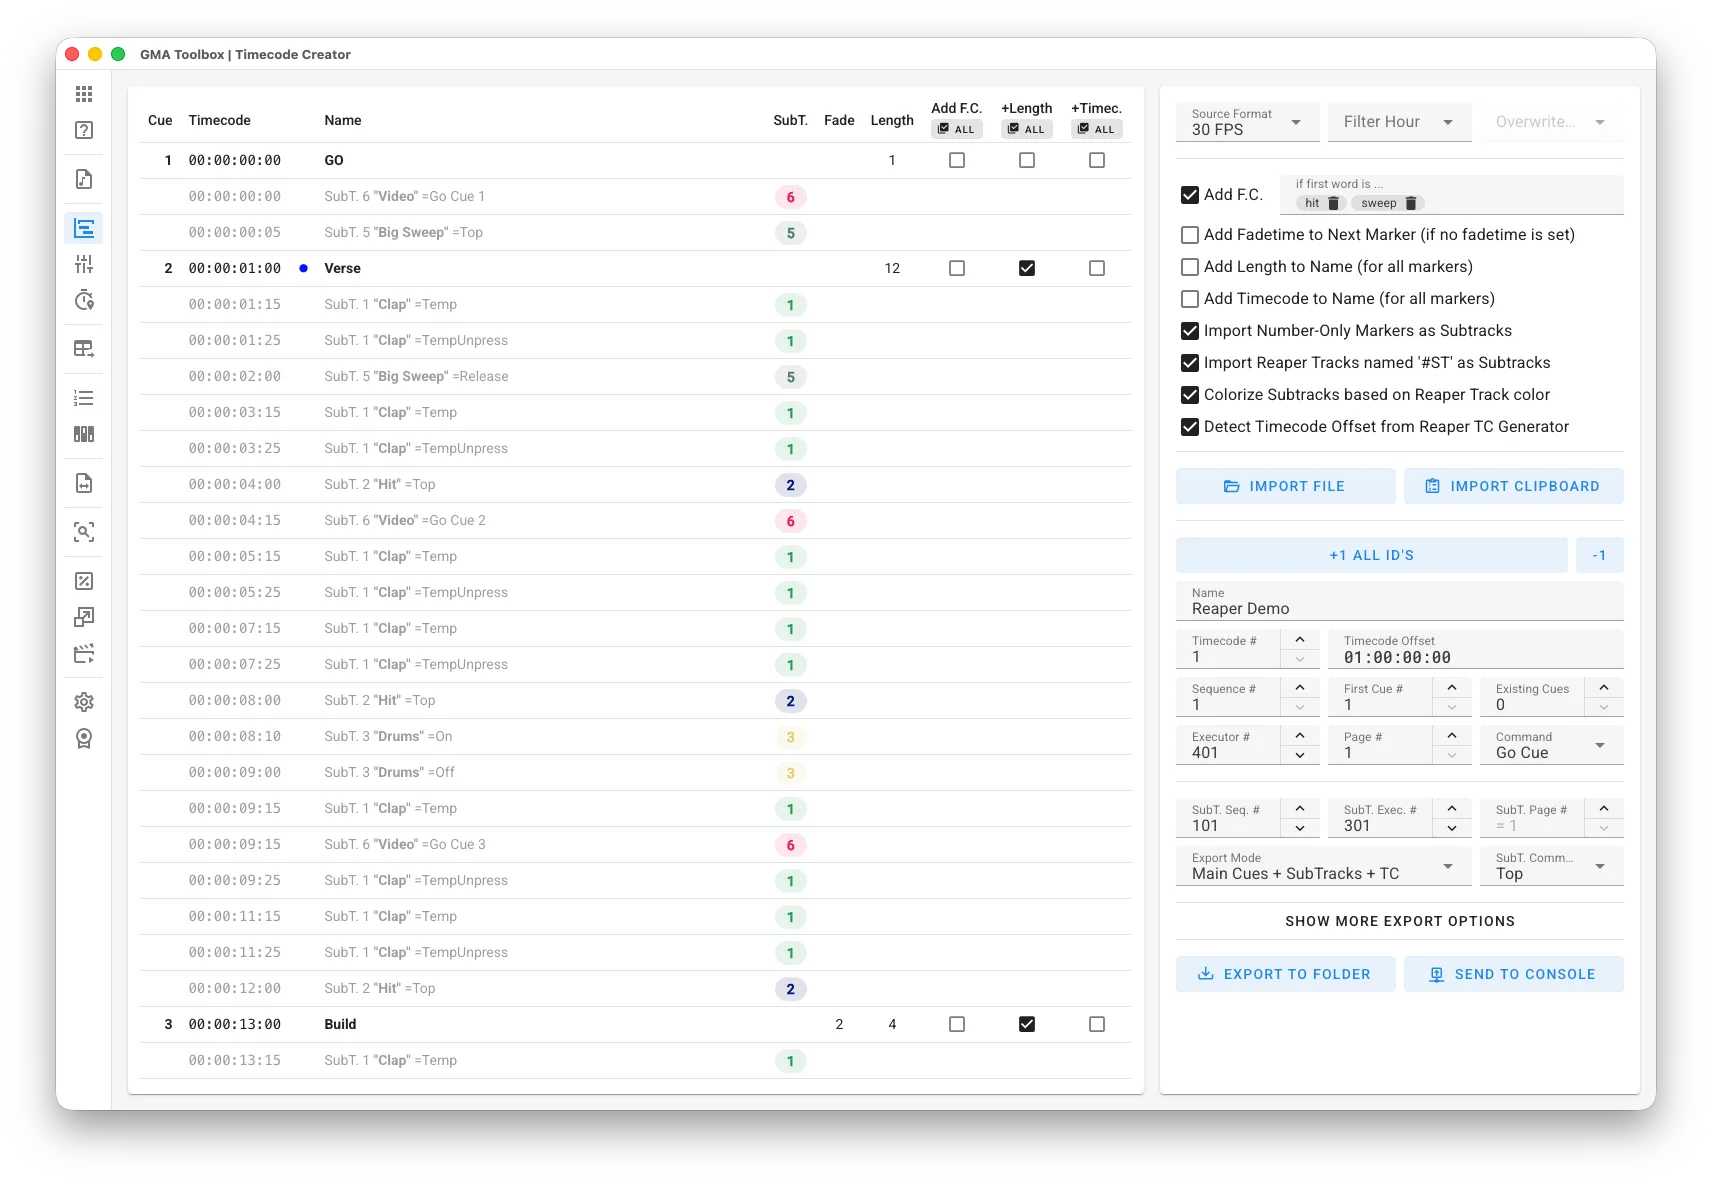
Section titled “Import”- Source Format: the timecode format used for import and export.
- Filter Hour: import only markers from one hour range, and change the hour value if you want. Useful when one project timeline holds several audio tracks.
- Add F.C. (Follow Cue): adds a follow-cue to every marker whose name contains one of your keywords, such as “hit” or “sweep”. This gives you a “store /cueonly” workflow. Use All in the table header to switch every imported item at once.
- Add Fadetime to Next Marker: sets the fade time to the cue length for every marker without its own fade time. Use All in the table header to switch every imported item at once.
- Add Length to Name: adds the cue length — the time to the next cue — to the cue name. Use All in the table header to switch every imported item at once.
- Add Timecode to Name: adds the cue timecode to the cue name.
- Import Number-Only Markers as Subtracks: reads markers named with numbers only as subtracks.
- Import Reaper Tracks named ‘#ST’ as Subtracks: reads Reaper tracks named “#ST” as subtracks.
- Colorize Subtracks based on Reaper Track color: colors the subtracks and their buttons with the color of the Reaper track.
- Detect Timecode Offset from Reaper TC Generator: reads the timecode offset from the first LTC or MTC generator track found in the Reaper file.
Destination
Section titled “Destination”- +1 All IDs: raises the destination IDs from your last import. Normal IDs go up by 1. Subtrack IDs go up by the number of subtracks in your last export. Change this behaviour on the Settings page.
- -1: lowers the destination IDs the same way.
- Name: the name of the timecode and the sequence. The tool fills this in from the imported filename.
- Timecode #: the target timecode pool number.
- Timecode Offset: the timecode offset.
- Sequence #: the target sequence pool number.
- Executor #: the executor that holds the sequence.
- Page #: the page of that executor.
- First Cue #: the number of the first cue in the sequence.
- Existing Cues: how many cues already sit in the sequence before the first cue. Set it to “2” if cue 0.1 and 0.2 already exist. Used for grandMA2 export only.
- Command: the timecode command: “Go Cue”, “Goto” or “Go”.
Subtracks
Section titled “Subtracks”- SubT. Seq. #: the first sequence number for subtracks.
- SubT. Exec. #: the first executor number for subtracks.
- SubT. Page #: the page for the subtrack executors, or the main page.
- SubT. Command: the command for subtracks — “Top”, “Go” or “On” — when the Reaper track does not set one.
- Export Mode: what goes into the export: “Main Cues + SubTracks + ”, “Main Cues + TC Only”, “SubTracks + TC Only” or “TC Only”.
Follow-cues, names and colors
Section titled “Follow-cues, names and colors”- F.C. Time: the delay for follow-cues, or follow as the trigger time.
- F.C. Fade: the fade time for follow-cues.
- F.C. Name: the name for follow-cues. Use the placeholder “{name}” to include the original marker name.
- Use Semicolon (;) to split Cue Name and Cue Info: splits the marker name at the “;”. The first part becomes the cue name, the second part goes into the cue info or notes field.
- Add Release Cue to ‘Top’ Subtracks (using F.C. Time & F.C. Fade): adds a release cue to “Top” subtracks, using your follow-cue time and fade settings.
- Limit color brightness for better visibility: caps the brightness of cue and button colors so they stay readable on the console.
- Replace Marker/Track Colors on Export: swaps imported colors for other colors through the replacement table. Use it to improve visibility, or to match your console’s color scheme — for example
#0000ffin Reaper but#003344on the console.
Table columns
Section titled “Table columns”- Cue: the target cue number.
- Timecode: the time of the cue.
- Name: the cue label, or the subtrack information.
- SubT.: the subtrack number.
- Fade: the fade time of the cue.
- Length: the cue length — the time to the next cue.
- Add F.C.: adds a follow-cue after this cue.
- Name + Length: adds the length to the cue label.
- Name + Timecode: adds the timecode to the cue label.
Set parameters in marker names
Section titled “Set parameters in marker names”You can set some parameters in the marker name itself:
| Write this | To do this |
|---|---|
#Fx or #Fx.y | set the fade time, e.g. “Build #ff10.5” for a 10.5 second fade |
#FF | set the fade time to the length of the cue |
#NL | add the length to the cue name |
#NT | add the timecode to the cue name |
#FC | add a follow-cue |
#FCx or #FCx.y | add a follow-cue and set its trigger time |
#FCF | add a follow-cue that uses follow |
#Lx | set the cue length to the x-th next marker (1 = next, the default) |
Three rules:
- Always use “.” as the decimal separator.
- Case does not matter.
#FFand#ffdo the same thing. - Put a space before the “#”. The tool needs it to find the parameter.
Subtracks from number-only markers
Section titled “Subtracks from number-only markers”Name these markers with numbers only: “1”, “2”, “3” and so on. Extra text is not allowed, so that the tool never confuses them with normal markers.
Each number is one subtrack. Markers with the same number end up in the same subtrack.
Switch on Import Number-Only Markers as Subtracks during import, or the markers stay normal markers.
For export, set SubTrack Command to “Top”, “Go” or “On”, depending on what the subtrack should do.
This method is simple and works with almost any software.
The tool names the subtrack sequences “TC#:ST#”. For example, “11:2” is the second subtrack of timecode 11.
Subtracks from Reaper tracks
Section titled “Subtracks from Reaper tracks”Use this method when you work with many subtracks. It keeps them visible and easy to handle, and it makes copying and pasting beat patterns much easier.
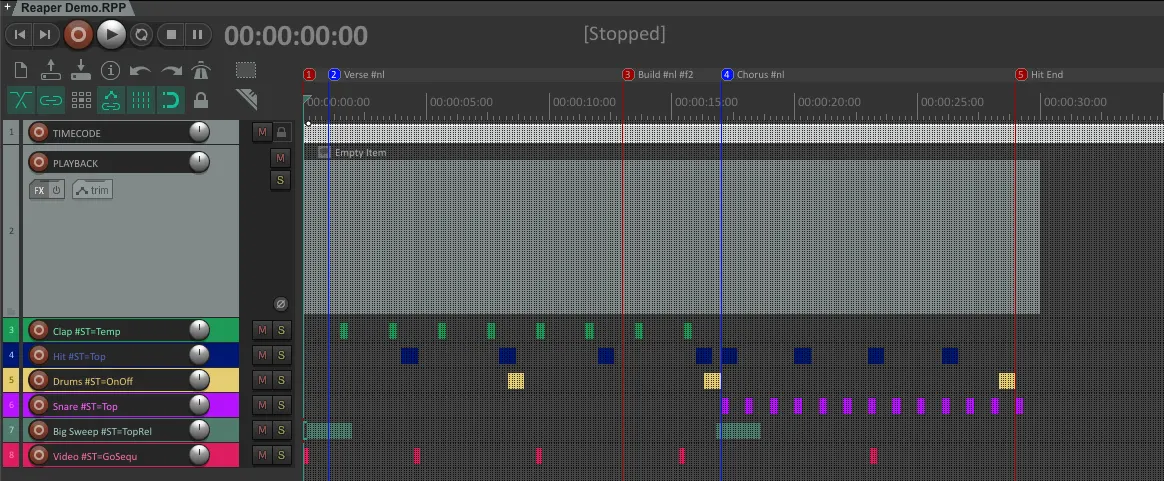
Download a demo project: Reaper_Demo_Project.RPP
To build a subtrack:
- Add a track in Reaper (Menu: Insert > Track).
- Put “#ST” in the track name. Add a descriptive name too, and the sequence gets that name — for example “Clap #ST”.
- Select the track and add events at the playhead (Menu: Insert > Empty item).
Every track named this way becomes a subtrack, and every item on it becomes a subtrack event.
The tool names the subtrack sequences “TC#:ST#” or “TC#:ST# Name”. For example, “11:2” or “11:2 Clap” is the second subtrack of timecode 11.
Set the command per track
Section titled “Set the command per track”Add the “#ST=” modifier to the track name:
| Command | Item start action | Item end action |
|---|---|---|
#ST=Flash | Flash | Flash Release |
#ST=Go | Go | (length ignored) |
#ST=On | On | (length ignored) |
#ST=OnOff | On | Off |
#ST=Temp | Temp | Temp Release |
#ST=Toggle | Toggle | Toggle |
#ST=Top | Top | (length ignored) |
#ST=TopGo | Top (first item), Go (the rest) | (length ignored) |
#ST=TopRel | Top | Release Cue |
Build whole sequences as subtracks
Section titled “Build whole sequences as subtracks”With these two commands every event becomes its own cue:
| Command | What it creates |
|---|---|
#ST=GoSequ | a sequence triggered by Go Cue, with one cue per event |
#ST=GotoSequ | a sequence triggered by Goto, with one cue per event |
Double-click an event in Reaper to open its Notes field. Use it to set the cue label, and the cue number as well. Start the text with #x and x becomes the cue number, for example #5 Chorus.
Reuse cue numbers to build repeating patterns, such as #1 #2 #3 #1 #2 #3. Do not skip a number: #1 #2 #4 does not work unless #3 appears somewhere in the sequence.
Marker parameters such as follow-cue and fade do not work for subtracks.