
Patch Creator
Build a grandMA patch from MVR, WYSIWYG, Depence or Excel data, including 3D positions, rotations and groups.
What it does
Section titled “What it does”- Reads four kinds of source data
Import fixtures from MVR files, Depence (R3/R4), WYSIWYG (R36+) or Excel. Each source has its own settings, such as custom fixture mapping (Spot, Channel, Unit or Dimmer) and merging all dimmer channels into one patch layer. - Translates positions and addresses
Fixture XYZ positions and rotations become grandMA data. Letter universes (A–ZZ) become numbers. Both happen in the background. - Splits the import into separate macros
Run the whole import at once, or run only the part you need: assign the patch, move and rotate fixtures, or build groups. Groups come from the attribute you pick — type, layer, position or color.
Before you start
Section titled “Before you start”How to use it
Section titled “How to use it”-
Export an MVR or CSV file:
- Export the MVR from your design tool.
- Unit: millimeters. Coordinates: world. No mirroring.
- Open Windows > Fixture Manager > Update Patch.
- Show the columns you need: right-click “Fixture ID” > Column Chooser, then add every “Pos” and “Rotation” column.
- Choose File > Export Table.
- Build your table with the columns the tool needs.
- Start from the template: XLS2GMA_CSV_Template.xlsx
- Choose File > Save As and pick “CSV UTF-8 (Comma delimited)”.
- Open Data-View > Spreadsheet > “All data (sortable)”.
- Show every column: right-click > View options… > Data View Options.
- Choose File > Export > Save as CSV.
- Export the MVR from your design tool.
-
Import the file:
- Set the import options: sorting, filtering and normalization.
- Set the options for your source — for example the WYSIWYG column mapping — on the Settings page.
- Import CSV or MVR File reads the file you exported.
-
Set the export options:
- Set the options per layer in the table.
- Set the general export options.
-
Export the patch:
- Set the export options for the layers and the general settings.
- Click Export to write the patch file.
-
Export the macros:
- Manual import: save the macros to a grandMA2 or grandMA3 folder, then import them on the console.
- Direct import: send the macros straight to the console. The console asks you to pick the first macro ID.
-
Import layers and fixtures (grandMA2):
- Run the macro “
NAME import layers” to import the patch layers.
Pick the drive that holds the export: 1 for a direct console transfer, 4 for USB storage in most cases. - In the Patch & Fixture Schedule window, import your FixtureTypes and assign them to the fixtures.
- Run the macro “
NAME patch fixtures” to patch every fixture. Check the FixtureType assignment first. - Run the macro “
NAME create groups” to build the groups. Groups that already exist are merged.
- Run the macro “
-
Change an existing setup (grandMA2 and grandMA3):
- Run “
NAME patch fixtures” to patch every fixture. - Run “
NAME create groups” to build or merge the groups. - Run “
NAME move fixtures” to update the positions and rotations.
- Run “
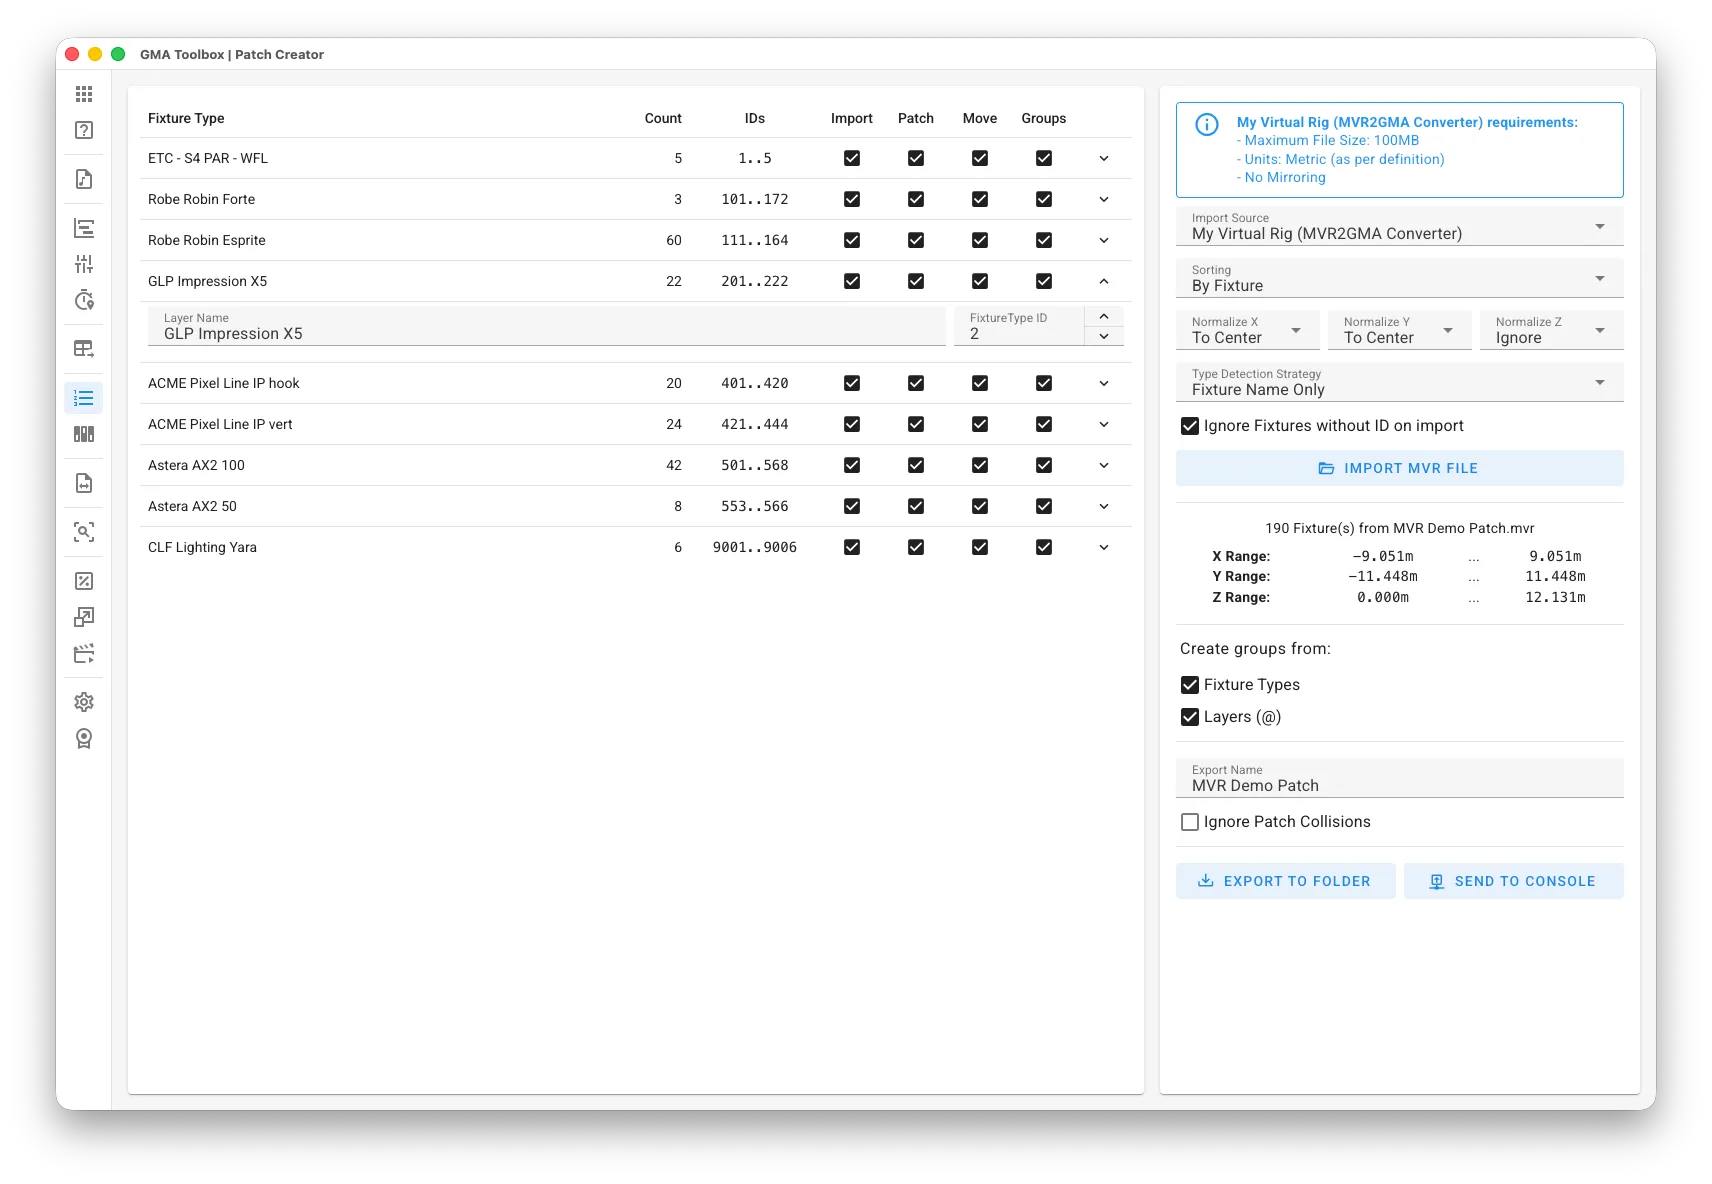
The screen explained
Section titled “The screen explained”Import
Section titled “Import”- Sorting: sort the fixtures by ID, or keep the order of the source file.
- Normalize X/Y/Z: shift the position values when they carry a large offset.
- Ignore: keep the values as imported.
- To Center: center the values. 280 to 320 becomes -20 to 20.
- Start From 0: start the values at zero. 280 to 320 becomes 0 to 40.
- End At 0: end the values at zero. 280 to 320 becomes -40 to 0.
- Type Detection Strategy: how the tool works out the fixture type during MVR import.
- GDTF Type (Name if Type is numeric or missing): use “GDTF Type”, but fall back to “Fixture Name” when the type is a number or missing.
- GDTF Type (Name if Type is missing): use “GDTF Type”, but fall back to “Fixture Name” when the type is missing.
- GDTF Type Only: use “GDTF Type”.
- Fixture Name Only: use “Fixture Name”.
- Fixture Name and GDTF Type: use both.
- Prefix Fixture Name with Position: during WYSIWYG import, put the position column in front of the fixture name.
- Group Channel-Only Fixtures: put every channel-only fixture into one layer. Name that layer on the Settings page.
- Ignore Fixtures without ID on import: skip every fixture that has no valid ID.
Export
Section titled “Export”- Create Groups from: the column the groups come from: Type, Layer, Position or Color.
- Export Name: the macro name.
- Layers (MA2 only): the column that sorts the fixtures into layers. Fixture Type is the default, but any groupable column works.
- Ignore Patch Collisions (MA2 only): assigns the DMX address even when something else already uses it. grandMA3 does this anyway.
Table columns
Section titled “Table columns”- Fixture Type: the fixture type of this layer.
- Count: how many fixtures sit in this layer.
- IDs: the fixture IDs (
#) in this layer. Channel IDs carry aCin front. - Import: include this layer in the import macro.
- Patch: include this layer in the patch macro.
- Move: include this layer in the move macro.
- Groups: include this layer in the groups macro.
- ↓ Layer Name: the name of the layer.
- ↓ FixtureType ID: the grandMA FixtureType ID for this layer. That FixtureType must already be imported.